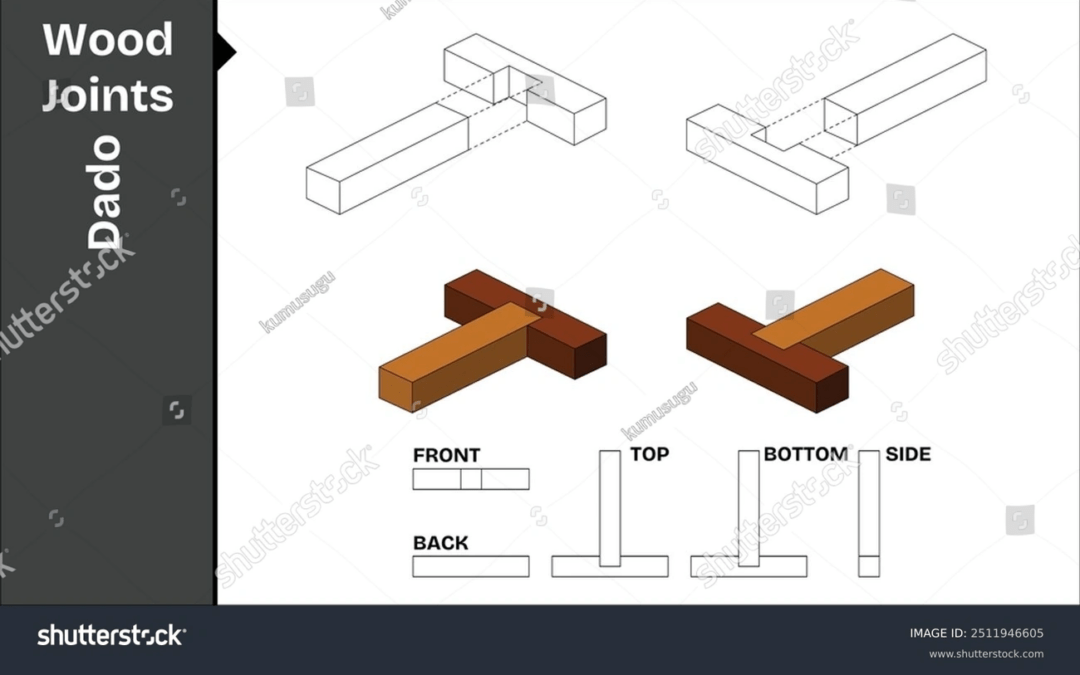
What is Dado Joinery?
A dado joint creates a three-sided channel cut across a wooden board’s grain to fit another piece of wood. Woodworkers in the UK call this channel a housing, while Europeans refer to it as a trench. The joint consists of a U-shaped slot with a bottom and two sides (shoulders) that creates a strong connection between two pieces. One board has the U-shaped channel cut into it, and the other board fits perfectly inside to form a right angle joint.
A dado joint’s unique feature lies in how it runs perpendicular to the wood grain. This is different from a groove which looks similar but runs parallel to the grain. You shouldn’t confuse dado joints with rabbet joints. A dado shows two shoulders and looks like a capital “U” from the side, while a rabbet has just one shoulder and resembles a capital “L”.
Dado joints offer key benefits that make them vital in woodworking:
- Increased structural integrity due to the larger glue surface area
- Self-alignment features that help maintain square during assembly
- Mechanical strength that distributes weight evenly
- Resistance to racking (becoming parallelogram-shaped) over time
These joints prove especially useful for projects that need to bear weight. They keep connected pieces firmly in place, which makes them perfect for shelving, cabinetry, and furniture construction. The joint transfers vertical load through both the glue bond and the dado’s bottom shoulder, creating a substantially stronger connection than simple butt joints.
Beginning woodworkers can easily master dado joints. Their straightforward design offers better strength than many other joining methods, including dowel and biscuit joints. This blend of simplicity and strength has made dado joinery a favorite technique among woodworkers.
Dado joints shine in projects where shelves or dividers must hold significant weight. The three-sided channel’s mechanical advantage stops sagging and maintains structural integrity long-term. A well-made dado joint creates a clean, professional connection while delivering the strength needed for practical use.
Types of Dado Joints
 Dado joints come in different styles and uses, each with unique benefits for specific woodworking projects. You’ll find four main types, and each has distinct features that make it perfect for different construction needs.
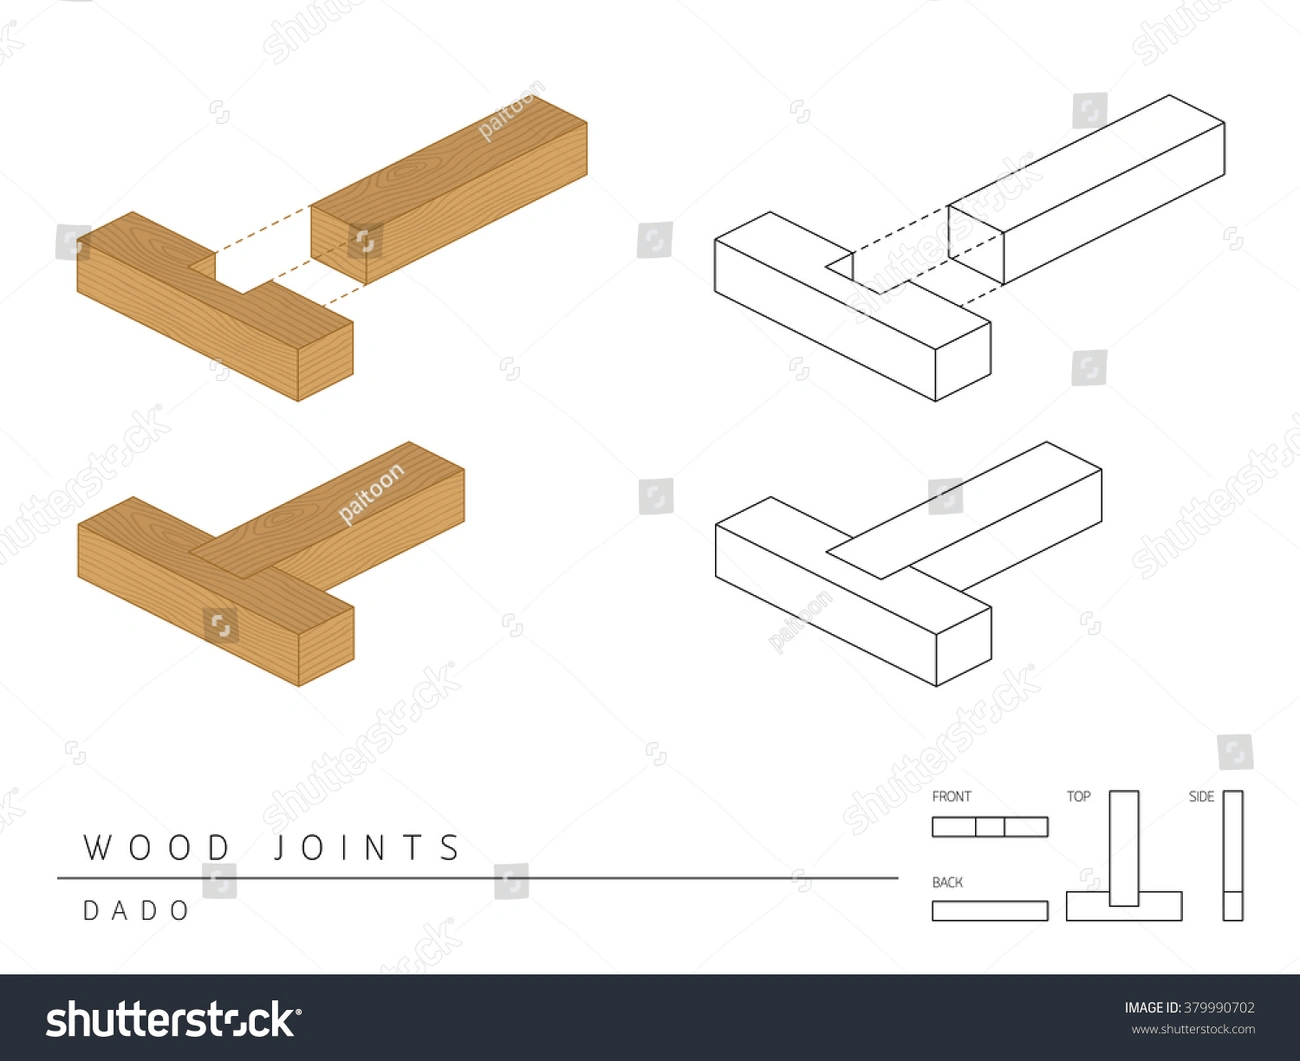
Through Dado
A through dado joint has a channel cut entirely across a board from one edge to the other. This creates a U-shaped slot that runs completely through the workpiece. These joints are the simplest to make, which makes them perfect for projects where quick assembly matters most. They work great in bookshelf construction – the shelves fit snugly into grooves cut into side panels. The complete channel lets you distribute weight evenly across the joint. The dado shows on both board edges, so these joints work best when looks aren’t your main concern or other design elements will hide the edges.
Stopped Dado
Stopped dado joints (also called blind dados) end before reaching the board’s far edge. This creates a channel with a dead end. The outer surface stays smooth and clean, which hides the joint in your finished piece. The channel typically stops at a distance equal to the wood’s thickness from one side. Woodworkers choose stopped dados when they need hidden connections that stay strong. These joints have four sides instead of three, unlike through dados. This gives you more surface area for glue to stick. You need extra precision to make this joint since you might need to cut a notch in the inserted board to match where the channel stops.
Blind Dado
Blind dados excel as box-style joints that work well in face-frame and frameless cabinets. These joints stand out because their channel stops before the panel edge and usually cuts to half the material’s width. They shine in CNC production and with vertical panel routers. Your cabinets become incredibly strong with blind dados—they can hold substantial weight even before you add fasteners. These joints give you both strength and clean looks, making them ideal for high-end cabinetry projects.
Rabbeted Dado
Rabbeted dados blend two joint types—dado and rabbet—to create stronger connections. You start by cutting a standard dado channel in one piece. Then you cut a notch along the other piece’s entire edge, creating a stair-step shape called a rabbet. The pieces lock together when assembled, making them stronger than regular dado joints. Most woodworkers use these with through dado joints rather than stopped ones. The dado cuts usually range from one-half to three-quarters of the inserted board’s thickness. Your project’s intended use and expected load determine the joint’s depth.
How Dado Joinery Works in Woodworking
 Dado joinery in woodworking works through physical connection rather than glue strength. A properly made dado joint transfers vertical load from the inserted piece to both the glue bond and the bottom shoulder of the receiving piece. This load-bearing feature makes dados work great at holding heavy weight in bookshelves and cabinets.
The dado’s strength comes from its three-sided channel design. The force spreads evenly across the joint surface when pressure hits the inserted board. This keeps connected pieces from moving. Weight distribution lets bookshelves and cabinets hold heavy loads without breaking. The joint handles downward weight well but isn’t as strong against sideways forces or tension.
Here’s how dado joinery works mechanically:
- Load spreads across the entire joint surface
- More glue surface area gives better bonding
- Mechanical resistance against downward pressure
- Self-aligning features keep things perpendicular
The dado’s depth affects its strength by a lot. A good dado depth is one-third to one-half the thickness of the receiving material. Solid wood needs just 1/8 inch for good support. Plywood and manufactured boards work better with deeper 1/4-inch cuts. Yes, it is surprising how this shallow channel can hold up heavy shelves and their contents.
Dado joints work best in structures where material has dados on both sides. The joint’s strength ended up depending on exact sizing – the width should be just slightly bigger than the thickness of the connecting piece. This tight fit will give optimal surface contact throughout the joint. It maximizes both mechanical connection and glue adhesion.
In spite of that, dado joints have their limits. The joint provides little sideways stability without extra support. Too much twisting force on the inserted piece can break the joint. Many woodworkers pair dado joints with other methods like through tenons or sliding dovetails. This creates structures with detailed structural strength.
Dado joinery’s mechanical advantage comes from its simple design. It turns vertical pressure into spread-out force, which makes it a lasting technique for building furniture and cabinets.
Tools Used for Making Dado Joints
Image Source: Fine Woodworking
Making precise dado joints needs specific tools. Each tool has its own strengths that work best in different woodworking situations. Your choice of tool should match your project needs, the wood you’re using, and the quality you want.
Dado blade
Dado blades are special circular saw attachments that have two outer blades and internal chippers to create flat-bottomed grooves. The stacked dado set is what most woodworkers use. You can adjust the width by changing the number of chippers and adding metal shims for a perfect fit. The outer blades need proper placement – you’ll usually see the printed side facing out – and the chipper teeth should alternate to stay straight. Some people use wobble dado blades because they cost less. These blades have an adjustable hub that changes width by moving the blade, but they don’t cut as cleanly as stacked sets.
Router
Routers stand out as precision tools for cutting dadoes. They always give you clean, square bottoms and exact cuts based on your bit size. Straight bits work best most of the time, but shear-cut straight bits do a great job with plywood thanks to their angled cutting edges. Your dado depth should stay at 1/8″ in solid wood and 1/4″ in plywood or MDF. Routers really shine when you need stopped dadoes, which makes them perfect for hidden joints.
Chisel and mallet
You don’t need much to cut dadoes by hand – just grab a marking knife, combination square, back saw, and sharp chisels. Make sure your chisel is narrower than the dado width so you don’t damage the shoulders while clearing waste. Sharp chisels are crucial – dull ones make the job nearly impossible. Start by marking clean shoulder lines, then remove waste through careful chisel cuts. Work to about half the depth first, then go all the way down to your baseline.
Table saw
Table saws give you the quickest way to cut dadoes. Most woodworkers use either dado stacks or make multiple passes with standard blades. With standard blades, cut both shoulders first, then clear out the middle with several passes. Flat top grind (FTG) teeth create the smoothest, flattest bottoms. Safety comes first – always use proper push sticks, set your depth right, and position your fence carefully.
Common Uses of Dado Joinery in Construction
Woodworkers use dado joinery in many projects because it provides excellent structural integrity and can bear heavy loads. These joints work as key building blocks that make assembled pieces strong and stable.
You’ll find dado joints most often in shelving systems. They work great in bookshelves and kitchen cabinets because these joints can handle substantial loads without sagging as time passes. Professional cabinetmakers rely on dado joints where cabinet sides, tops, and bottoms connect.
Dado joinery shines in several other areas:
- Custom built-in furniture (desks, entertainment centers) that needs to stay stable for years
- Drawer construction, especially when attaching drawer bottoms to sides
- Drawer dividers and partitions that need support on both sides
- Cabinet shelves that take daily abuse and heavy items
- Sideboards that demand reliable structural strength
Dado joints prove valuable in both face-frame and frameless cabinet work. These joints show up often in flat pack furniture design because they make assembly much easier. Housing joints (another name for dados) work perfectly in bookcase construction. The groove design helps spread weight across the entire joint surface.
Best Practices for Strong and Clean Dado Joints
Strong dado joints demand careful attention to detail during construction. Professional woodworkers know that well-executed joints deliver stability and a refined look.
Measure and mark accurately
Successful dado joinery starts with precise measurement. A 0.5mm mechanical pencil works best to mark lines. The pencil covers half the line but leaves enough visible space to cut accurately. Measurements should reference from the same edge of the workpiece to maintain consistency. Clear X symbols help mark waste areas and prevent accidental removal of important material. Hand-cut dados benefit from a consistent layout process. Marking from the workpiece’s bottom reduces errors.
Use clamps to arrange
Clamps should hold workpieces firmly to stop movement during cutting. Router techniques work best with guide fences placed on the counterclockwise side of the router’s path. The guide fence needs a perfectly straight square edge that the router base can reference against. Scrap strips clamped to workpiece edges prevent blowout damage where the bit exits the material.
Test fit before gluing
The joint should come together with firm hand pressure. Needing a mallet means the fit is too tight and could split the wood. A piece that falls in freely signals a joint that’s too loose to provide strength. Wall angles need checking with a square to ensure they don’t slope inward toward the dado bottom. Small adjustments to the inserted piece often work better than modifying the dado itself.
Choose the right depth and width
The 50% rule states that dado depth must stay under half the material thickness to maintain strength. Optimal depth ranges between 1/4″ and 5/16″ for 3/4″ stock. Width tolerance plays a vital role – standard fits in 3/4″ plywood with 0.720″ actual thickness need dados between 0.722″-0.725″ wide for permanent joints. Material thickness needs measuring directly instead of trusting nominal dimensions, especially with plywood that can vary up to 0.038″.
FAQs
1. What is a dado joint and how does it differ from other woodworking joints?
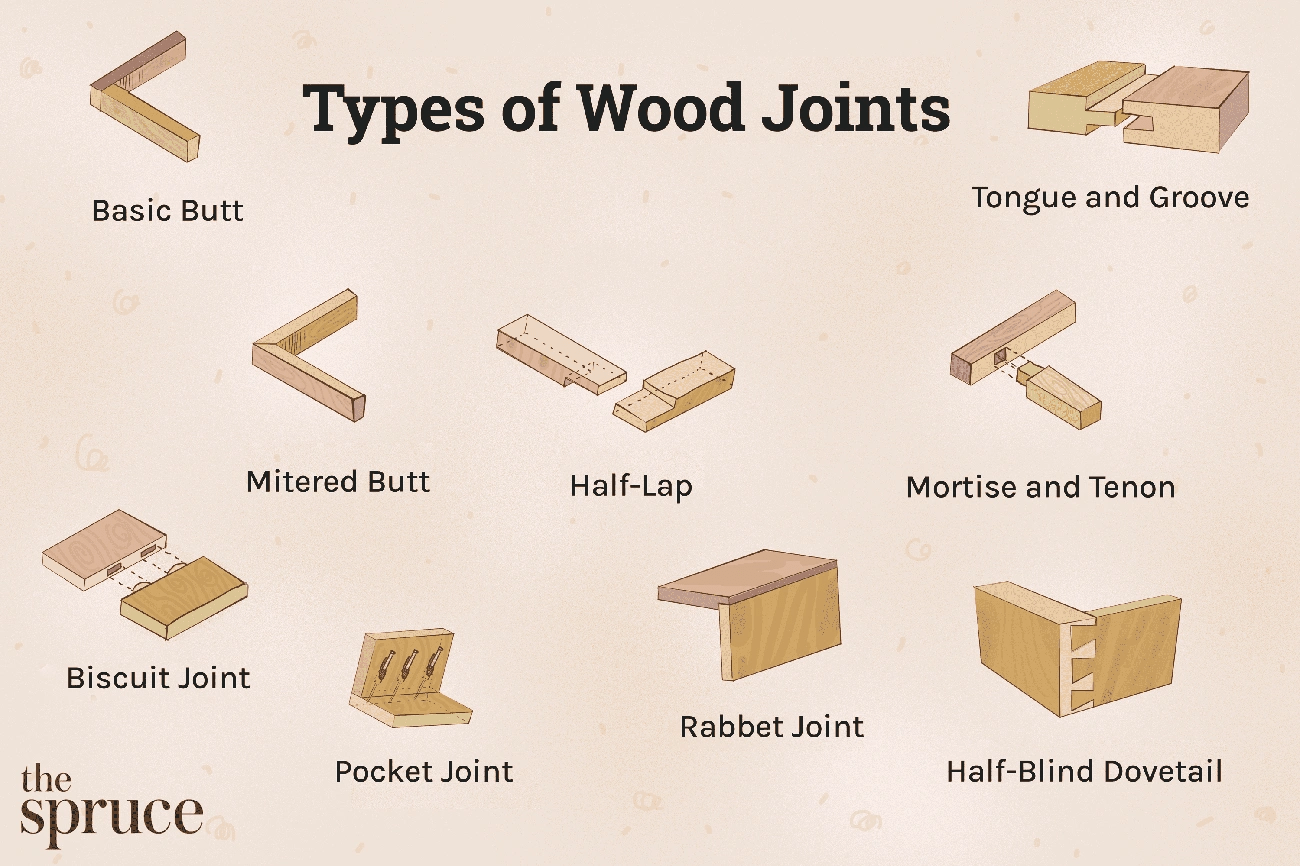
A dado joint is a three-sided channel cut across the grain of a wooden board to receive another piece of wood. It differs from other joints like rabbets or grooves in its structure and orientation. Dados run perpendicular to the wood grain and have two shoulders, providing increased structural integrity and load-bearing capacity.
2. What are the main types of dado joints used in woodworking?
There are four primary types of dado joints: through dado, stopped dado, blind dado, and rabbeted dado. Each type has unique characteristics suited for different applications, from visible shelving to concealed cabinetry connections.
3. What tools are commonly used to create dado joints?
The main tools for making dado joints include dado blades for table saws, routers with straight bits, chisels and mallets for hand-cutting, and standard table saws using multiple passes. The choice of tool depends on the project requirements, material type, and desired finish quality.
4. How deep should a dado joint be cut for optimal strength?
For optimal strength, the depth of a dado joint should typically range from one-third to one-half the thickness of the receiving material. In solid wood, a depth of 1/8 inch is often sufficient, while plywood and manufactured boards benefit from deeper 1/4-inch cuts.
5. What are some best practices for creating strong and clean dado joints?
To create strong and clean dado joints, it’s important to measure and mark accurately, use clamps for proper alignment, test fit before gluing, and choose the right depth and width. The maximum dado depth should never exceed half the material thickness, and the width should be just slightly larger than the thickness of the mating piece for a snug fit.
Show facts