
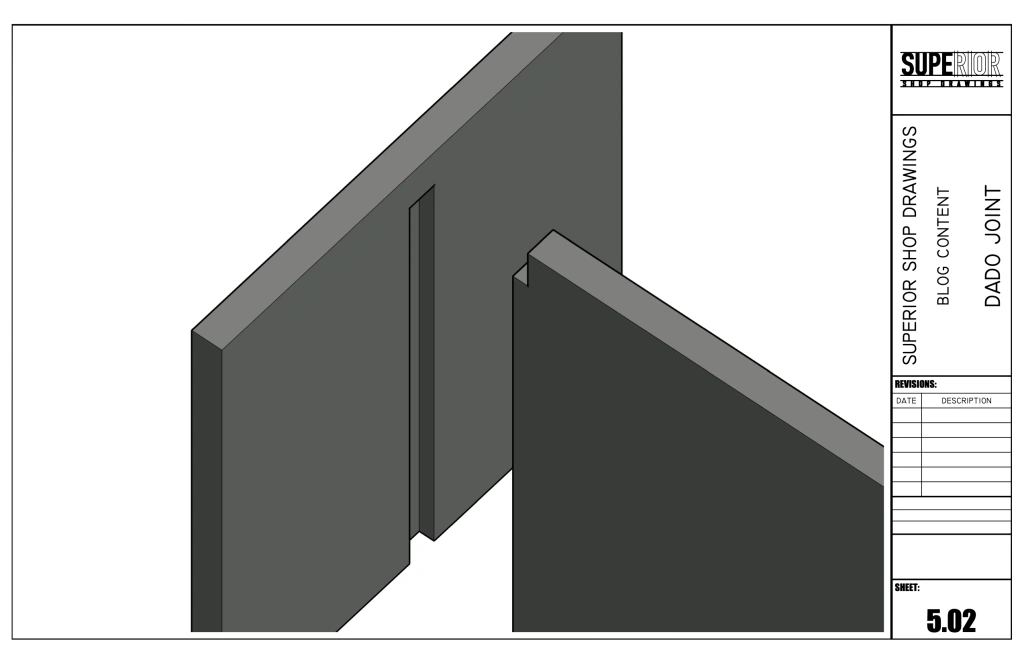
What is a Dado Joint?
A dado joint creates a right angle by cutting a three-sided channel across the wood grain to connect one piece’s end to another’s side. British woodworkers call it a housing joint, while Europeans know it as a trench. This joint has a U-shaped channel with a square bottom and two sides called “shoulders” that match the inserted wood piece’s thickness.
Dados differ from grooves because woodworkers cut them across the grain instead of parallel to it. This crosswise cutting makes the joint stronger. The word “dado” comes from Italian and describes a cut made just above the wood piece’s base.
These joints work great for structural support because of their mechanical strength. A well-made dado joint creates a self-locating connection that keeps parts from moving in at least one direction. The design also gives you more glue surface area than butt joints, which leads to stronger bonds.
You’ll find dado joints most often in:
- Bookshelves and cabinetry shelving
- Drawer dividers and compartments
- Case furniture construction
- Cabinet structures with inset doors or drawers
Furniture makers love dado joints because they resist racking forces that could turn squares into parallelograms. This resistance helps furniture stay square for years. The joint design also handles heavy loads well, which makes it perfect for shelves holding books, appliances, or tools.
Making dado joints is straightforward. You can use hand planes, chisels, routers, or table saws with dado blade attachments. Many woodworkers prefer stacked dado blades for precise cuts. These joints are often stronger than needed, which gives you extra safety without making things complicated.
Dado joints hit the sweet spot between strength, simplicity, and usefulness in wood joinery. Some joints like stub tenon and groove, tongue and groove, and sliding dovetail might be slightly stronger due to more contact area. Yet the dado’s easy construction and reliable performance make it the top choice for cabinets and shelves.
 Types of Dado Joints
Woodworkers classify dado joints into three main types based on how they cut the channel and how far it runs. Each type gives you different advantages that work well for specific woodworking projects. These joints affect both how strong the piece is and how it looks when finished.
Through dado
Through dado joints have a channel that extends completely across the board from one edge to the other. This creates a continuous U-shaped slot. These joints are the most common type and run fully through the wood’s width. Woodworkers often choose through dados for practical projects where function matters more than looks. They’re great for shelving units and simple cabinetry because they can handle heavy loads well.
Through dados are easy to make. All the same, you’ll see the connection on both edges of the board, which might not look great in fine furniture. You can hide this by adding a face frame or decorative trim after you put everything together.
Stopped dado
A stopped dado starts at one edge but stops before reaching the other side. This creates a channel with a planned end point. Your piece looks better because you can only see the connection from one side. The board that fits into a stopped dado can stay whole. You could also cut a notch in its end that matches the dado’s thickness, letting it sit flush with the edge.
Making stopped dados needs more skill than through dados. So most woodworkers use router tables to get cleaner cuts on these joints. The extra work pays off with better results. These joints work really well for visible cabinetry, bookshelves, and furniture where you want to hide the connections.
Blind dado
Blind dado joints keep everything hidden by starting and stopping before reaching the board’s edges. No one can see the joint from any angle. These joints are perfect for fine furniture where visible connections might spoil the design.
You need to be really precise when making blind dados. The piece that fits into a blind dado needs careful notching on both ends to match the uncut board sections. The process takes more work, but blind dados look amazing in high-end cabinetry, custom furniture, and decorative projects where craftsmanship details matter substantially.
The right dado joint depends on what you need structurally, how you want it to look, and what tools and skills you have.
Essential Tools for Making Dado Joints
You need specialized tools to create precise dado joints that will give you accuracy and improve your joinery work. The right equipment makes it easier to create these functional connections in woodworking projects.
Dado blade
A dado blade combines two outer blades with inner chipper blades between them to create flat-bottomed channels. This specialized blade stack connects to a table saw arbor, and the number of chippers determines the dado width. The outer blades typically have kerf widths of about 3.2mm, and inner chippers range from 1.5mm to 3.0mm. Shim spacers of 0.3mm-0.4mm let you fine-tune the cut width. Stacked dado sets create cleaner, flatter bottoms than wobble dado blades. Make sure your table saw can handle these specialized blades since many need a throat plate with a wider slot.
Router
Routers are incredibly versatile tools for dado creation. They work better than table saws for cutting stopped dadoes that don’t run through the entire workpiece. Standard straight router bits do an excellent job, and shear-cut straight bits are particularly good with plywood. The best results come from bits with the shortest cutting edges that fit your job. Different materials need different dado depths—1/8″ is enough for solid wood, while 1/4″ works better for manufactured boards like plywood or MDF. A straight-edge guide clamped to the workpiece creates precise cuts, though dedicated dado jigs provide better accuracy for repeated cuts.
Chisel
Chisels play two important roles in dado joinery—they clean machine-cut dadoes and create them by hand. Chisels help refine the joint’s edges and bottom after power tool cuts. Hand-cut dadoes start with marking knife boundaries, followed by backsaw or handsaw kerfs. The next step uses the largest chisel that fits between the kerfs, held flat against the work with the bevel up, to clear waste material. Router planes help level the bottom surface, though skilled woodworkers get excellent results using just chisels with good technique.
Marking gage
A marking gage creates more accurate layout lines than pencil marks. Metal gages with small steel cutting wheels make clean, narrow lines perfect for joinery work. The wheel should stay fixed—not spin freely—while scoring wood. The gage sets exact locations and depths for dadoes and leaves crisp reference lines for tools to follow. The wheel’s bevel should point toward the fence to maintain steady pressure against the workpiece edge.
Clamps
Clamps hold workpieces and guide systems steady during dado cutting. F-clamps are the most versatile option and come in lengths from 150mm to 1 meter. One-handed quick-release clamps help manage complex setups alone, while lever clamps offer tough all-metal construction. Securing straight-edge guides works best with clamps paired with sacrificial fences that protect your equipment and workpieces. Well-placed clamps stop materials from moving during cutting and act like extra hands to keep your joinery precise.
Step-by-Step: How to Make a Perfect Dado Joint
Making precise dado joints needs a step-by-step process that creates strong, functional connections. You can create perfect dado joints by doing this and being organized, whatever technique you end up choosing.
1. Measure and mark the dado location
The first step is finding the exact spot for your dado joint. Take an adjustable square to mark the bottom edge of the dado. Make sure you reference from the same edge of your workpiece. Mark a series of Xs on the waste side of your line. This shows the area you need to remove. A 0.5mm pencil works better than a thicker one. It lets you line up cutting tools with greater precision.
2. Set the depth of cut
Joint strength depends heavily on your dado depth. You have two common options: cut the dado one-third the thickness of your material if pieces join on both sides, or make it one-half for stronger single-sided joints. Standard 3/4-inch cabinetry material needs cuts about 1/4 inch deep (one-third) or 3/8 inch deep (one-half). The board could weaken if you cut deeper than needed.
3. Use a dado blade or router to cut
Table saw cutting requires installing your dado stack to match material thickness. Make shallow cuts in one pass, or use multiple passes for deeper dados. Router users should secure a straight edge as a guide for precise cuts. Wider dados need two parallel straight edges. This prevents tapering during multiple passes. Stopped dados require marking where the cut should end (usually 1/4 inch from the edge).
4. Clean up the edges with a chisel
Machine cutting should be followed by using the largest chisel that fits between dado walls. Keep it flat against the work surface with the bevel up. Remove waste halfway down before working near the baseline. Turn the chisel bevel down for remaining center waste. You could also use a router plane set to final depth. It levels the bottom surface well as you work from both edges toward center.
5. Test fit the joint
A well-made dado joint needs a “press fit.” It should be tight enough to need some pressure but not so tight that it needs too much force. Check for inward-angling walls if the piece starts into the dado but won’t go all the way. Use a paring chisel to remove any material blocking the fit. The joint fits properly if there’s minimal side-to-side movement.
Common Mistakes to Avoid When Making Dado Joints
Creating dado joints can challenge even experienced woodworkers. Understanding common mistakes helps you achieve strong, professional-looking joints in your projects.
Cutting too deep or too shallow
The depth of your dado affects joint strength. Cutting deeper than half the board thickness can substantially weaken the wood. A 3/4-inch material works best with 1/4-inch deep dados for pieces with dados on opposite sides, or 3/8-inch for single-sided applications. Dados that are too shallow (less than 1/8-inch in solid wood) won’t provide enough support, while cuts that are too deep will compromise the wood’s strength.
Not securing the workpiece
Materials can shift during cutting if you don’t clamp them properly, which results in inaccurate dados. You need to secure your workpiece firmly to a stable surface with the right clamps. Proper clamping helps prevent kickback and safety issues. Table saw operations require featherboards both before and after the cutting area to maintain steady downward pressure.
Using the wrong blade or bit
Poor tool choices create uneven width and rough surfaces. Your chippers and outer blades must be installed correctly and tightened well. Router operations work best with bits that have the shortest suitable cutting edges. The blade you choose should match your material thickness – thicker woods need larger blades with specific tooth configurations.
Skipping test cuts
Test cuts on scrap material matter, especially during router table or dado blade setup. These tests let you check your setup accuracy. Cutting without verification often creates poorly sized dados that won’t form strong joints. Here’s a basic rule: you can make a groove wider by adjusting the fence gradually, but making it narrower means starting over.
FAQs
1. What is the ideal depth for a dado joint?
The ideal depth for a dado joint depends on the application. For standard 3/4-inch material, a depth of 1/4 inch is suitable for pieces joined on both sides, while 3/8 inch provides greater rigidity for single-sided applications. It’s important not to cut deeper than necessary to maintain the board’s strength.
2. How can I ensure a clean and precise dado cut?
To ensure a clean and precise dado cut, use the right tools such as a dado blade or router, make accurate measurements, and secure your workpiece properly. Always perform test cuts on scrap material before working on your actual project. Clean up the edges with a chisel or router plane for a perfect finish.
3. What are the different types of dado joints?
There are three main types of dado joints: through dado, which extends completely across the board; stopped dado, which begins at one edge but stops before reaching the other; and blind dado, which is concealed on both edges. Each type has its own applications and esthetic considerations.
4. What tools are essential for making dado joints?
Essential tools for making dado joints include a dado blade for table saws, a router with appropriate bits, chisels for cleanup, a marking gage for precise layout, and clamps to secure workpieces and guides. The choice of tools may vary depending on the specific project and preferred woodworking techniques.
5. How do I test if my dado joint fits correctly?
A properly fitting dado joint should have a “press fit” – tight enough to require some pressure to fully seat, but not so tight that it needs excessive force. Test the fit by inserting the mating piece into the dado. There should be minimal side-to-side play, and the piece should sit flush when fully inserted. If it doesn’t fit properly, make minor adjustments as needed.